
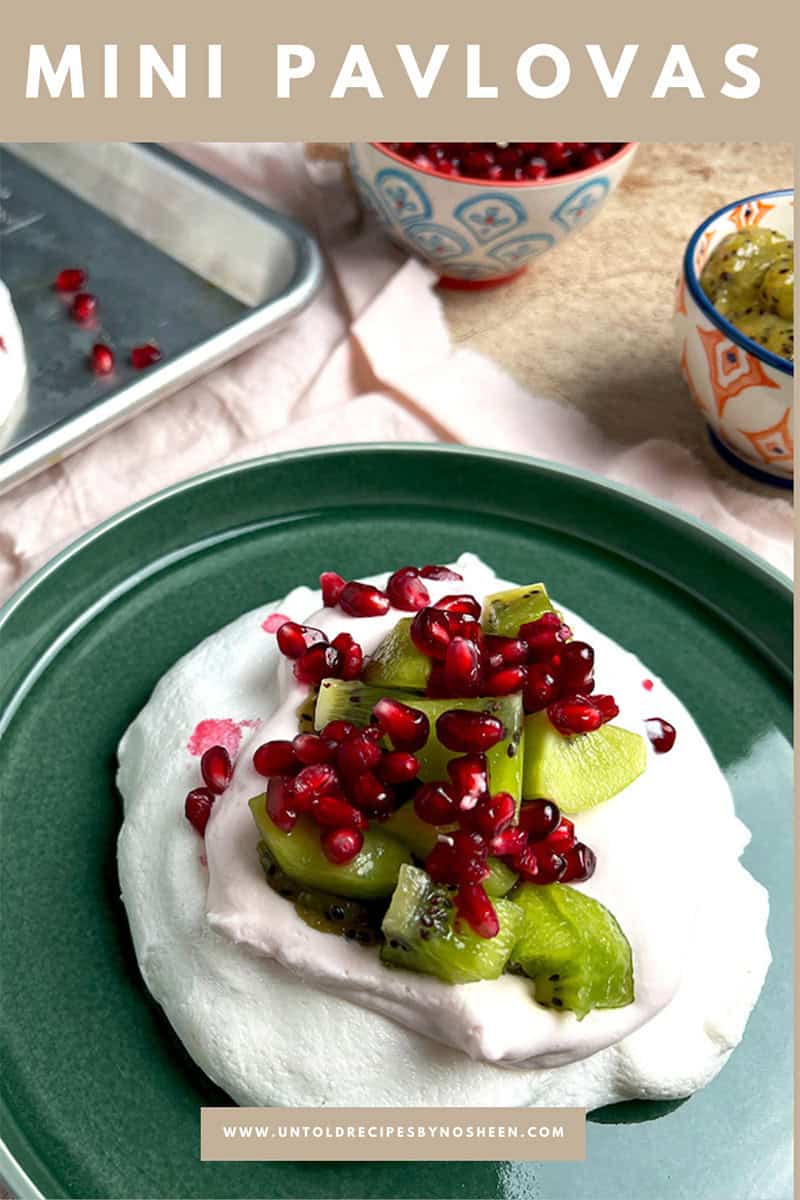
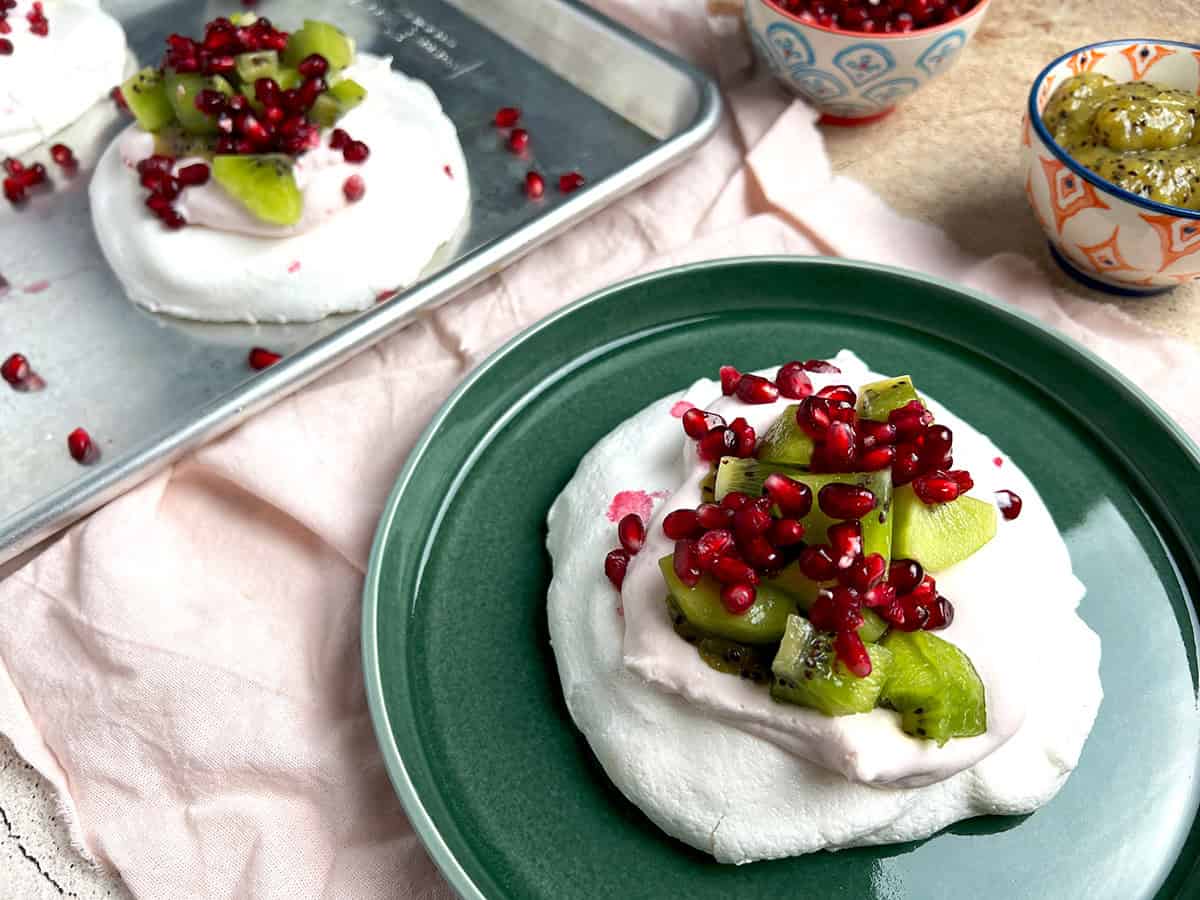
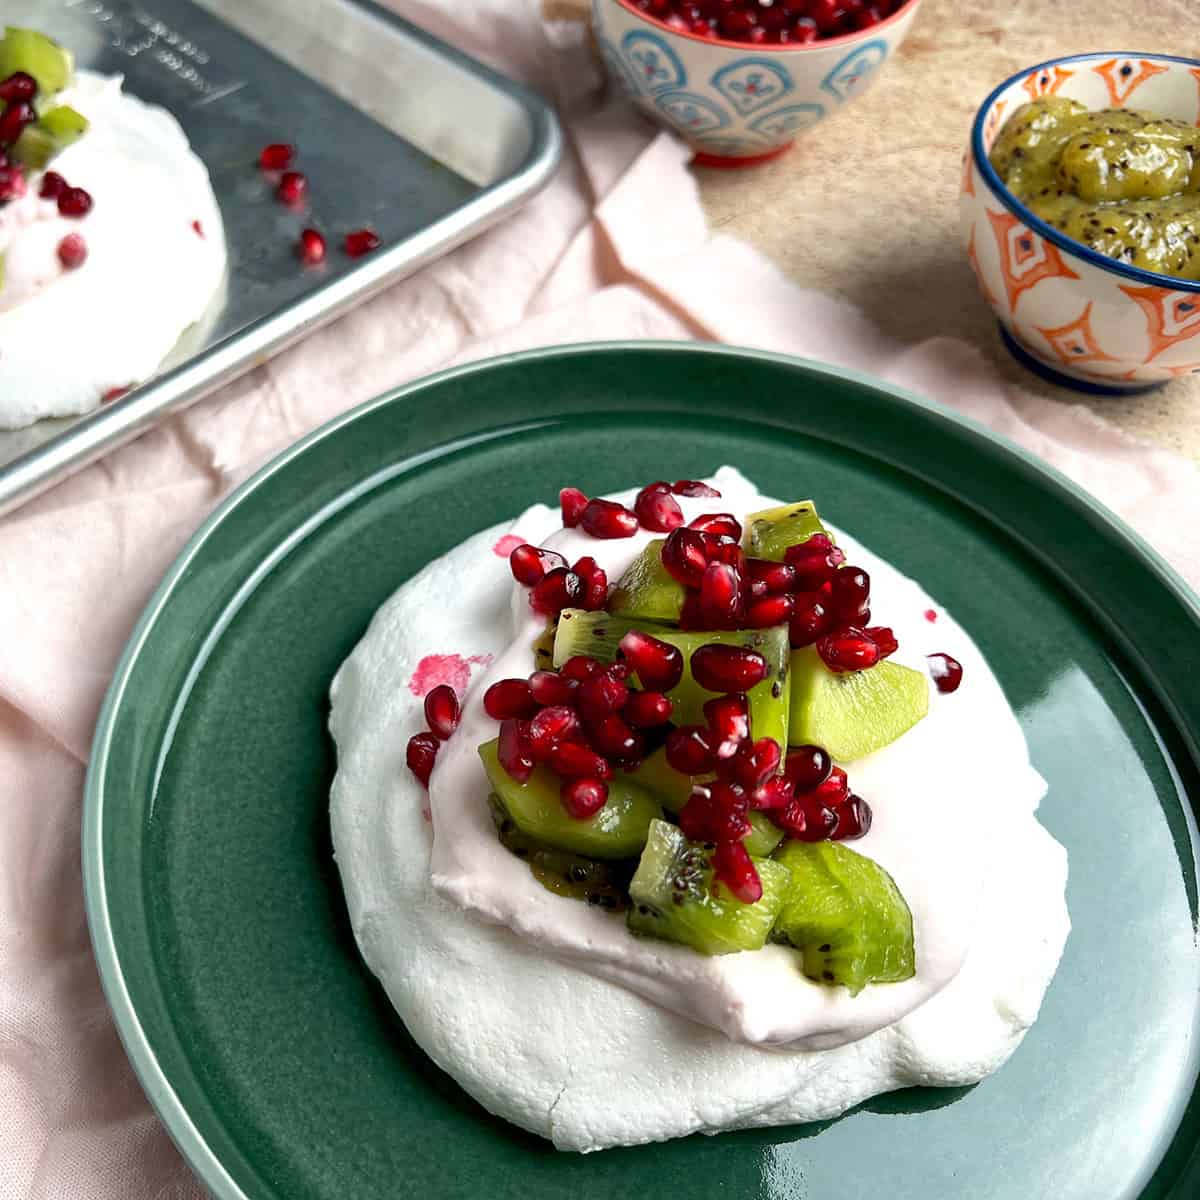
Crispy on the outside and soft and pillowy on the inside, these elegant mini pavlovas are a light and airy dessert. Topped with lightly sweetened rose cream, kiwi compote, and fresh fruit, this dessert delights the palate and the eyes.
WANT TO SAVE THIS RECIPE?
This popular dessert from Australia (or possibly New Zealand) is named after the Russian ballerina Anna Pavlova. Contrary to popular opinion, pavlova is not a meringue. A meringue is crispy and dry throughout, whereas a pavlova is crispy on the outside and has a soft marshmallow-like center.
Baking a perfect pavlova is well within your reach with a bit of patience! Follow the recipe precisely, and don't rush through the process for perfect mini pavlovas at your table. Then, create your variations using lemon curd, raspberry sauce, or plain and simple whipped cream and seasonal berries.
Jump to:
Why you'll love this mini pavlova recipe
- Quick and easy recipe - I love making mini pavlovas as they bake quicker than one large pavlova and are easier to handle.
- Versatile recipe - This recipe allows for so many variations. Add your favorite flavoring to the cream; use homemade blueberry compote or create a delicious holiday version with some cranberry curd.
- Great way to use egg whites - Every time I make a recipe that requires only egg yolks, my family knows a pavlova is coming up next. This is a great way to use up those leftover egg whites.
- It can be made a day ahead - Bake your pavlova a day ahead and allow it to cool overnight in the oven. Add your favorite toppings before serving for a quick and easy dessert.
Ingredient notes
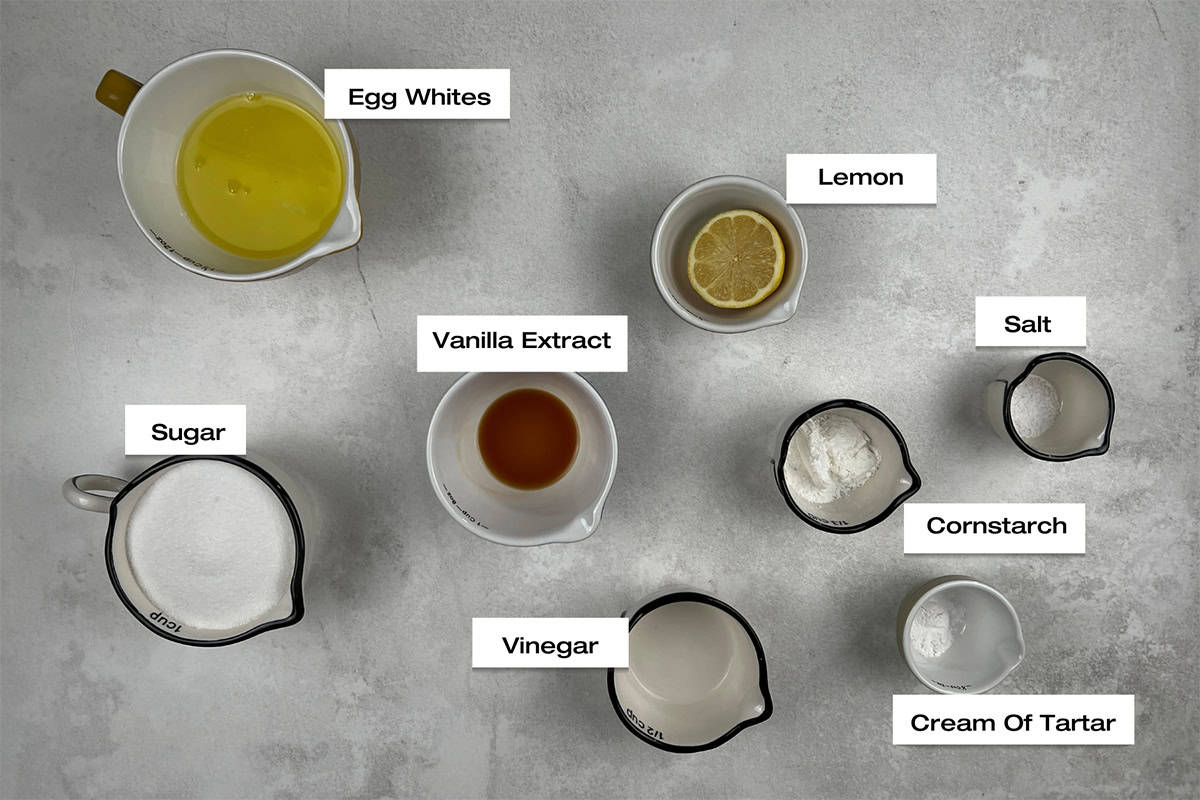
- Lemon - Rub half a lemon all over your mixing bowl before you add the eggs. The acid in the lemon will cut through any residual fat in the bowl, resulting in egg whites with lots of volume.
- Eggs - Use fresh eggs and separate the whites well, ensuring no yolk makes its way into them.
- Cream of tartar - An essential ingredient that helps stabilize the mini pavlovas, minimizing the risk of it collapsing.
- Salt - This helps balance the sweet taste of the pavlova, and I always add it.
- Sugar - Always use superfine sugar when making a pavlova. Granulated sugar may not dissolve completely, and confectioner's sugar can make the Pavlova dull in finish.
- Vinegar - White distilled vinegar helps maintain the structure of the pavlova and ensures a crisp outer shell with a soft center.
- Vanilla extract - This is added for flavor and aroma and should be added at the end.
- Cornstarch - This is added to strengthen the pavlova and prevent it from collapsing.
Please see the recipe card at the bottom of this post for the complete list of ingredients with measurements plus recipe instructions.
Substitutions & variations
- Use vinegar to wipe the bowl - If you don't have lemons, wipe down your mixing bowl with white distilled vinegar instead.
- Use stabilized whipped cream - Dissolve one teaspoon of unflavored gelatin in 2 tablespoons of water, add it to the cream and sugar, and whip.
- Try different toppings - Dust some powdered sugar at the end, add a sprig of mint for a pretty finish or set up a pavlova bar with baked mini pavlovas and assorted toppings.
How to make the mini pavlovas
Preparing the eggs
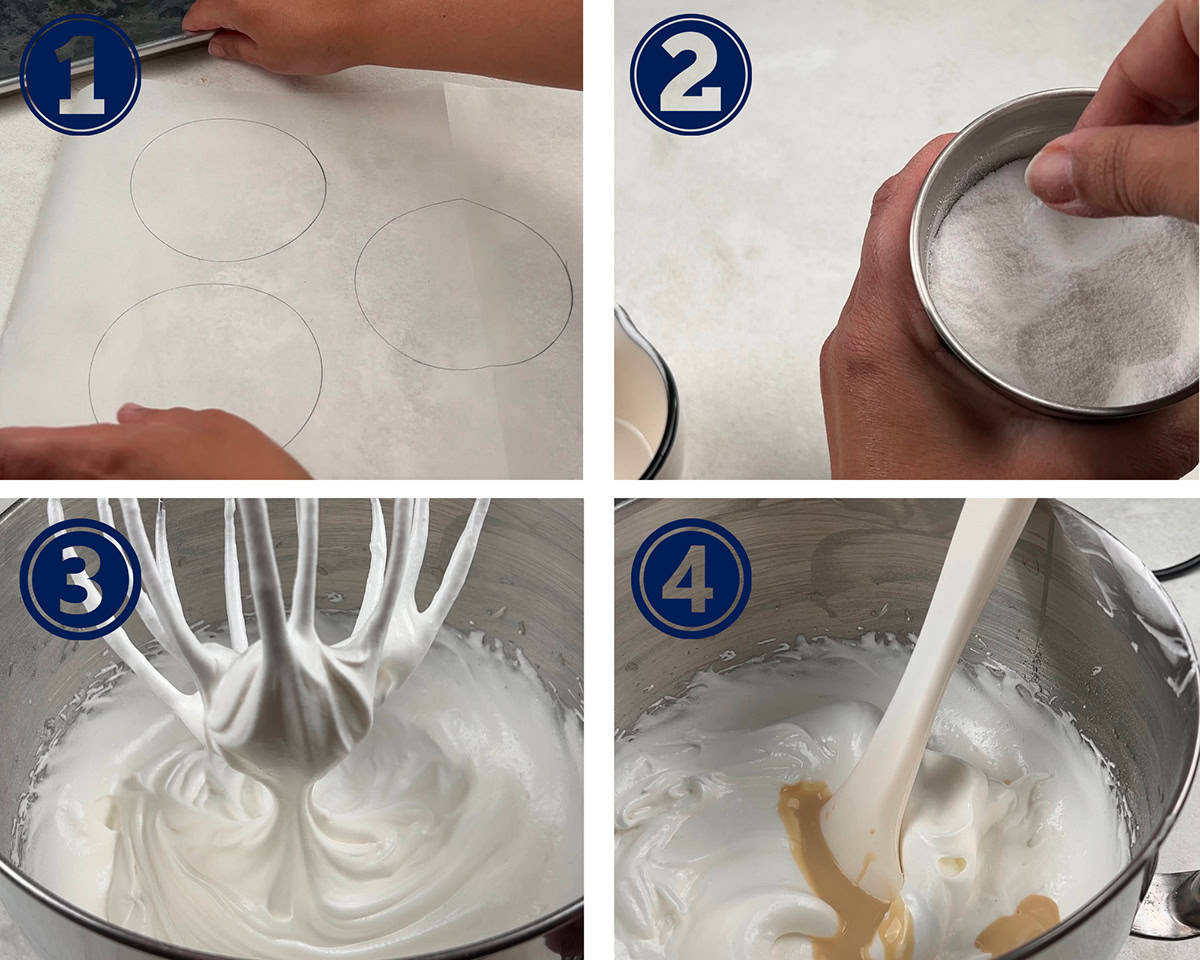
- First step - Preheat the oven to 275 degrees Fahrenheit, and then take a piece of parchment paper and trace four 4-inch circles on it with a pencil. Flip this paper upside down onto your baking sheet and set aside.
- Second step - Grind the granulated sugar in a small coffee or spice grinder until it has a superfine texture.
- Third step - Rub the bowl of your mixer with lemon and then add the egg whites, salt, and cream of tartar. Whip at medium speed until you have medium stiff peaks, and then add in the sugar, one tablespoon at a time, until it is well incorporated and you have stiff peaks.
- Fourth step - Mix the vinegar, cornstarch, and vanilla into a slurry and gently fold into the whipped egg mixture.
Making the toppings
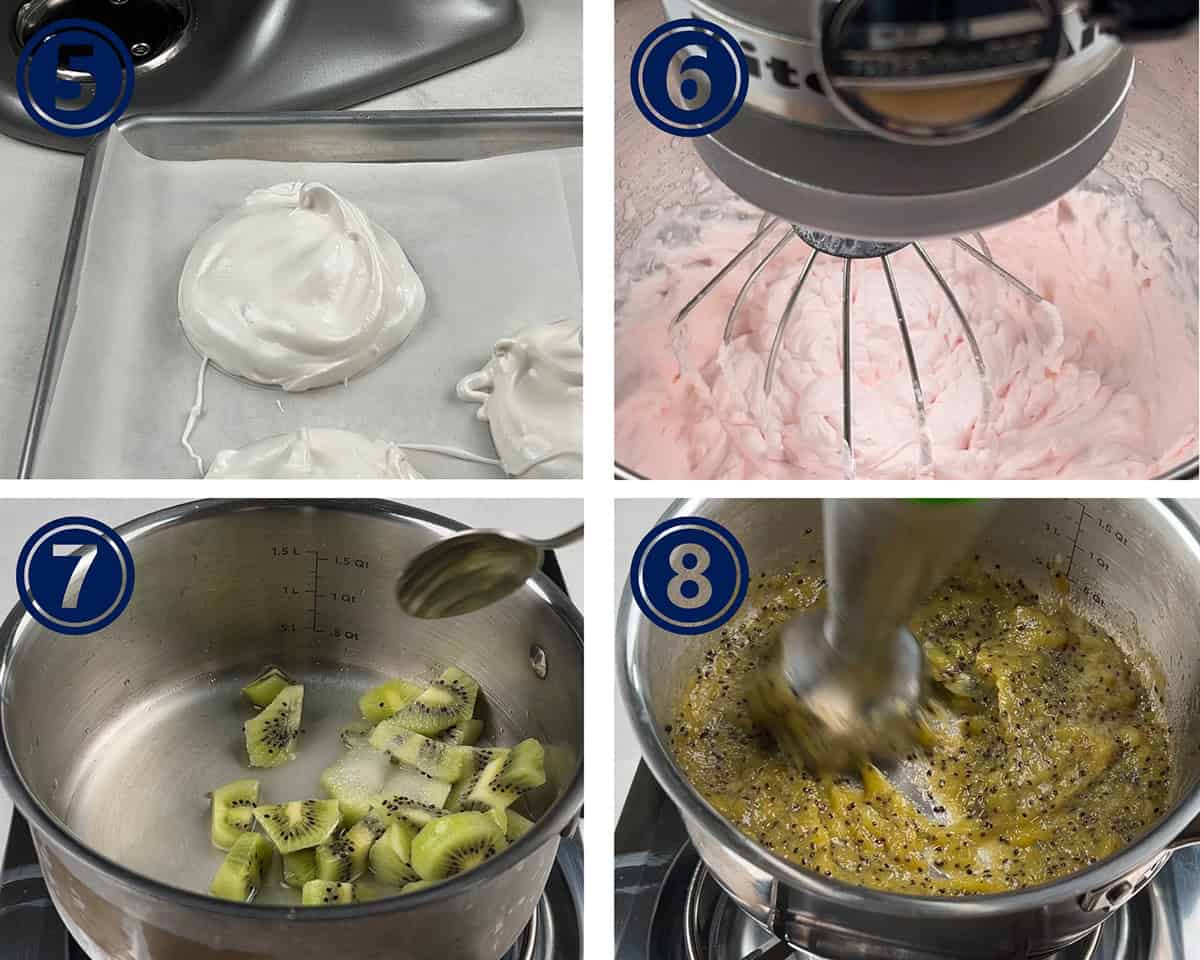
- Fifth step - Use a spoon to place this mixture onto the baking sheets, making four even circles. Flatten the top and use the back of a spoon to make a small hollow in the center of each mini pavlova. Place in the oven and bake for 15 minutes before reducing the heat to 225 degrees Fahrenheit. Continue to bake for an additional 45 minutes before you turn off the oven. Leave the pavlovas in the oven for at least 4 hours to gradually cool down.
- Sixth step - Meanwhile, prep the rose cream by adding the heavy whipping cream, confectioners sugar, rose water, and red food coloring and whip it to a firm consistency. Set this aside in the fridge until you need it.
- Seventh step - Peel and chop the kiwis, add them to a saucepan with some water, lemon juice, and sugar, and cook on medium heat for 15 minutes.
- Eighth step - Once the kiwis are cooked enough to be mashed, puree this mixture with an immersion blender and set it aside to cool.
Assembling the pavlovas
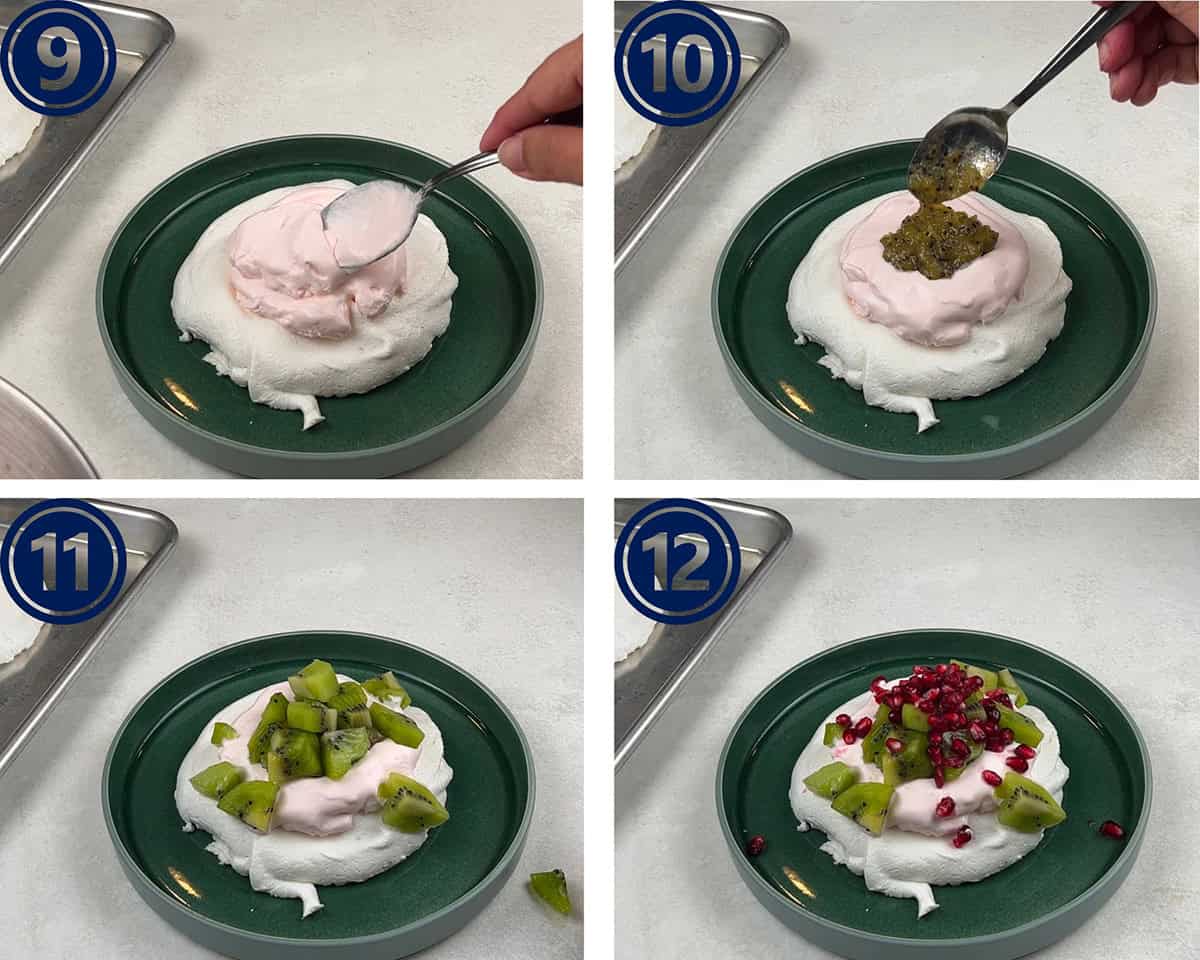
- Ninth step - Once the mini pavlovas are completely ready, gently remove them from the parchment paper and place them in a serving dish. Add a quarter cup of the whipped cream to the top.
- Tenth step - Follow with two tablespoons of the chilled kiwi compote.
- Eleventh step - Peel and chop some fresh kiwi and add next.
- Twelfth step - Finally, garnish each mini pavlova with the pomegranate seeds and enjoy.
Expert Tips
- Separating the egg whites - Do this while the eggs are still chilled, as the yolks are firmer at this temperature and less likely to break, so that you won't get any bits in your whites. Once separated, you can set the whites aside to reach room temperature, which is ideal for whipping them.
- Weighing the ingredients - Precise measurements of the ingredients are essential. Since eggs come in all sizes, weighing the whites rather than using a specific number of egg whites is better. Similarly, weigh the sugar to ensure you have the perfect ratio of eggs and sugar for an ideal structure.
- Whisking the egg whites - Always whisk at medium speed, as high speed causes the air to build up rapidly, which can later cause the mini pavlovas to collapse.
- Adding the sugar - Strictly stick to adding the sugar one tablespoon at a time. This ensures it's completely dissolved in the mixture, and the Pavlova is more stable and will not weep.
- Cooling the Pavlova slowly - If the mini pavlovas are removed from the oven immediately, it's likely to deflate and crack. This is why the best solution is to leave it in the oven after you turn it off. Leave the light on to monitor it, and let it gradually cool down as the oven temperature lowers.
Recipe FAQS
The Pavlova can be baked and stored in an airtight container for up to 1-2 days in a cool, dry place at room temperature. Make sure to add the toppings just before serving, as they will add moisture that can make the pavlova soggy.
The most common reason for this is humidity. I always choose a cool and dry day to make my pavlova. Not adding enough sugar and cutting down on baking and cooling time can also cause this.
Unfortunately, leftovers can't be stored for more than two days. Place the mini pavlovas in an airtight container, without any of the toppings, in a cool and dry environment. Freezing is impossible as defrosting adds moisture, making the pavlova sticky.

Other dessert recipes you may like

If you decide to try this mini pavlova recipe, Please don't forget to leave a rating and comment below! If you take a picture, tag me on Instagram! Thank You!
Mini Pavlovas (With Rose Cream & Kiwi Compote)
WANT TO SAVE THIS RECIPE?
Ingredients
- 5 egg whites (see notes)
- ¼ teaspoon salt
- ½ teaspoon cream of tartar
- 1 cups superfine sugar (see notes)
- 1 teaspoon vinegar (see notes)
- 1 teaspoon vanilla extract
- 2 teaspoon cornstarch
- ½ lemon
Whippes Rose Cream
- 1 cup heavy whipping cream
- 2 tablespoon confectioners sugar
- ½ teaspoon rose water
- 2 drops red food coloring (optional)
Kiwi Compote
- 2 kiwis
- 1 tbsps cornstarch
- 1 lemon
- ¼ cup water
Fruit
- 2 kiwis
- ½ pomegranate
Instructions
Baking The Pavlova
- Preheat your oven to 275°F
- Trace 4 four-inch circles on a sheet of parchment paper. (see notes)
- Separate the egg whites, making sure no drops of yolk remain.
- Weigh the whites to make sure you have no more than 150 grams of liquid
- Weigh your sugar to ensure you have no more than 200 grams of sugar, and grind it in a small coffee grinder until you have a super fine texture. (see notes)
- Make sure your mixing bowl is well washed and dried and rub the ½ lemon all over it (see notes)
- Whip the egg whites, salt, and cream of tartar until you get medium-stiff peaks.
- Start adding in the sugar slowly, 1 tablespoon at a time, till you get stiff peaks. (see notes)
- Make a slurry of the vinegar, vanilla and cornstarch and gently fold it in.
- Transfer the mixture to the parchment, staying inside the 4-inch circles you traced. (see notes)
- Bake for 15 minutes at 275 degrees farenheit, then reduce the heat to 225 degrees farenheit and continue to bake for an additional 45 minutes. (see notes)
- Once the Pavlova is done, DO NOT remove it from the oven. Leave it in the oven for atleast 4 hours so it cools down gradually. (see notes)
Whipped Rose Cream
- Add the heavy whipping cream, confectioner sugar, rose water, and red food coloring in a mixing bowl.
- Whip until you have a firm texture and set aside in the fridge.
Kiwi Compote
- Peel and chop the kiwis and cook them with the lemon juice, sugar, and water for 15 minutes at low heat.
- Use an immersion blender to puree the mixture and set aside to cool.
Fruit
- Peel and chop the kiwi and place it in the fridge to keep it chilled.
- Deseed the pomegranate and set the seeds aside to use later.
Assembling The Pavlovas
- Set the completely cooled pavlovas on a clean surface, making sure to handle them gently as they can fall apart easily.
- Add a quarter cup of the whipped cream to the top.
- Place 2 tablespoons of the kiwi compote on top.
- Garnish with the prepared fruit, and enjoy.

Leave a Reply